
I am just popping in for a quick update today though as I am running around like a crazy person this weekend but I love this tip SO much I wanted to share it even though I was super busy. There is no photography class today, but I am cooking for a client who is having a party of 75 (!!!) and I have thousands of mini bites of food to make!
So let’s get right down to the tip!
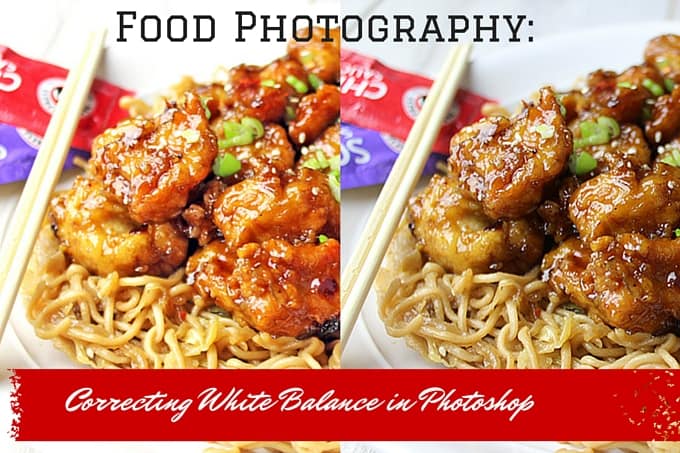
Starting with our underexposed image: Panda Express Orange Chicken <– You have to make this dish… trust me. I tried so hard to make this photo look good in my camera but the lighting was just NOT working with me. It was a miserably cloudy/rainy day and I couldn’t amp up my lighting enough.
Enter Photoshop! I am using the Cloud version, so this is the most up to date version of the software. Lets go to the menu and click on “Image”


Okay here we are in the curves window (Seriously Photoshop you couldn’t have given newbies a clue about this tool!?). See those three little droppers? There is a black one, a grey one and a white one. Click on the white one.
 And here it is just one click later (okay fine, I think it was closer to 5 or 6 tries) but look at the difference. The Orange Chicken looks like it came alive. All the drab coloring from the rainy day is gone, you would think this was getting the benefit of a beautiful day outside.
Now if you are a seasoned photo editor I am sure you can find a ton of places you could make the picture even better, but for a blogger who is looking for an easy fix to dull lighting, try this out and see if it helps!
PS, one more quick tip for you. If you are clicking around looking for the white that works best you can undo quickly with Control-Alt-Z so you don’t have to use your mouse in the menu to undo. So for example:
Click on white, eww gross, Control-Alt-Z, click on white, eww…etc. Control-Alt-Z is like my best friend in Photoshop. You can play with the tool in just seconds and with just a few quick clicks.
Hope that helps! Now I have to get back to 300+ mini cheesecakes. Wish me luck.
